|
|
[English](./README_EN.md) / [捐助本项目](https://github.com/jianchang512/pyvideotrans/blob/main/about.md) / [Discord](https://discord.gg/TMCM2PfHzQ) / Q群 905581228
|
|
|
|
|
|
# 语音识别转文字工具
|
|
|
|
|
|
这是一个离线运行的本地语音识别转文字工具,基于 fast-whipser 开源模型,可将视频/音频中的人类声音识别并转为文字,可输出json格式、srt字幕带时间戳格式、纯文字格式。可用于自行部署后替代 openai 的语音识别接口或百度语音识别等,准确率基本等同openai官方api接口。
|
|
|
|
|
|
>
|
|
|
> 部署或下载后,双击 start.exe 自动调用本地浏览器打开本地网页。
|
|
|
>
|
|
|
> 拖拽或点击选择要识别的音频视频文件,然后选择发声语言、输出文字格式、所用模型(已内置base模型),点击开始识别,识别完成后以所选格式输出在当前网页。
|
|
|
>
|
|
|
> 全过程无需联网,完全本地运行,可部署于内网
|
|
|
>
|
|
|
> fast-whisper 开源模型有 base/small/medium/large-v3, 内置base模型,base->large-v3识别效果越来越好,但所需计算机资源也更多,根据需要可自行下载后解压到 models 目录下即可。
|
|
|
>
|
|
|
> [全部模型下载地址](https://github.com/jianchang512/stt/releases/tag/0.0)
|
|
|
>
|
|
|
|
|
|
|
|
|
# 视频演示
|
|
|
|
|
|
|
|
|
https://github.com/jianchang512/stt/assets/3378335/d716acb6-c20c-4174-9620-f574a7ff095d
|
|
|
|
|
|
|
|
|

|
|
|
|
|
|
|
|
|
|
|
|
|
|
|
# 预编译Win版使用方法/Linux和Mac源码部署
|
|
|
|
|
|
1. [点击此处打开Releases页面下载](https://github.com/jianchang512/stt/releases)预编译文件
|
|
|
|
|
|
2. 下载后解压到某处,比如 E:/stt
|
|
|
|
|
|
3. 双击 start.exe ,等待自动打开浏览器窗口即可
|
|
|
|
|
|
4. 点击页面中的上传区域,在弹窗中找到想识别的音频或视频文件,或直接拖拽音频视频文件到上传区域,然后选择发生语言、文本输出格式、所用模型,点击“立即开始识别”,稍等片刻,底部文本框中会以所选格式显示识别结果
|
|
|
|
|
|
5. 如果机器拥有英伟达GPU,并正确配置了CUDA环境,将自动使用CUDA加速
|
|
|
|
|
|
|
|
|
# 源码部署(Linux/Mac/Window)
|
|
|
|
|
|
0. 要求 python 3.9->3.11
|
|
|
|
|
|
1. 创建空目录,比如 E:/stt, 在这个目录下打开 cmd 窗口,方法是地址栏中输入 `cmd`, 然后回车。
|
|
|
|
|
|
使用git拉取源码到当前目录 ` git clone git@github.com:jianchang512/stt.git . `
|
|
|
|
|
|
2. 创建虚拟环境 `python -m venv venv`
|
|
|
|
|
|
3. 激活环境,win下命令 `%cd%/venv/scripts/activate`,linux和Mac下命令 `source ./venv/bin/activate`
|
|
|
|
|
|
4. 安装依赖: `pip install -r requirements.txt`,如果报版本冲突错误,请执行 `pip install -r requirements.txt --no-deps` ,如果希望支持cuda加速,继续执行代码 `pip uninstall -y torch`, `pip install torch --index-url https://download.pytorch.org/whl/cu121`
|
|
|
|
|
|
5. win下解压 ffmpeg.7z,将其中的`ffmpeg.exe`和`ffprobe.exe`放在项目目录下, linux和mac 自行搜索 如何安装ffmpeg
|
|
|
|
|
|
6. [下载模型压缩包](https://github.com/jianchang512/stt/releases/tag/0.0),根据需要下载模型,下载后将压缩包里的文件夹放到项目根目录的 models 文件夹内
|
|
|
|
|
|
7. 执行 `python start.py `,等待自动打开本地浏览器窗口。
|
|
|
|
|
|
|
|
|
# Api接口
|
|
|
|
|
|
接口地址: http://127.0.0.1:9977/api
|
|
|
|
|
|
请求方法: POST
|
|
|
|
|
|
请求参数:
|
|
|
|
|
|
language: 语言代码:可选如下
|
|
|
|
|
|
>
|
|
|
> 中文:zh
|
|
|
> 英语:en
|
|
|
> 法语:fr
|
|
|
> 德语:de
|
|
|
> 日语:ja
|
|
|
> 韩语:ko
|
|
|
> 俄语:ru
|
|
|
> 西班牙语:es
|
|
|
> 泰国语:th
|
|
|
> 意大利语:it
|
|
|
> 葡萄牙语:pt
|
|
|
> 越南语:vi
|
|
|
> 阿拉伯语:ar
|
|
|
> 土耳其语:tr
|
|
|
>
|
|
|
|
|
|
model: 模型名称,可选如下
|
|
|
>
|
|
|
> base 对应于 models/models--Systran--faster-whisper-base
|
|
|
> small 对应于 models/models--Systran--faster-whisper-small
|
|
|
> medium 对应于 models/models--Systran--faster-whisper-medium
|
|
|
> large-v3 对应于 models/models--Systran--faster-whisper-large-v3
|
|
|
>
|
|
|
|
|
|
response_format: 返回的字幕格式,可选 text|json|srt
|
|
|
|
|
|
file: 音视频文件,二进制上传
|
|
|
|
|
|
Api 请求示例
|
|
|
|
|
|
```python
|
|
|
import requests
|
|
|
# 请求地址
|
|
|
url = "http://127.0.0.1:9977/api"
|
|
|
# 请求参数 file:音视频文件,language:语言代码,model:模型,response_format:text|json|srt
|
|
|
# 返回 code==0 成功,其他失败,msg==成功为ok,其他失败原因,data=识别后返回文字
|
|
|
files = {"file": open("C:/Users/c1/Videos/2.wav", "rb")}
|
|
|
data={"language":"zh","model":"base","response_format":"json"}
|
|
|
response = requests.request("POST", url, timeout=600, data=data,files=files)
|
|
|
print(response.json())
|
|
|
```
|
|
|
|
|
|
|
|
|
|
|
|
# CUDA 加速支持
|
|
|
|
|
|
**安装CUDA工具** [详细安装方法](https://juejin.cn/post/7318704408727519270)
|
|
|
|
|
|
如果你的电脑拥有 Nvidia 显卡,先升级显卡驱动到最新,然后去安装对应的
|
|
|
[CUDA Toolkit](https://developer.nvidia.com/cuda-downloads) 和 [cudnn for CUDA11.X](https://developer.nvidia.com/rdp/cudnn-archive)。
|
|
|
|
|
|
安装完成成,按`Win + R`,输入 `cmd`然后回车,在弹出的窗口中输入`nvcc --version`,确认有版本信息显示,类似该图
|
|
|

|
|
|
|
|
|
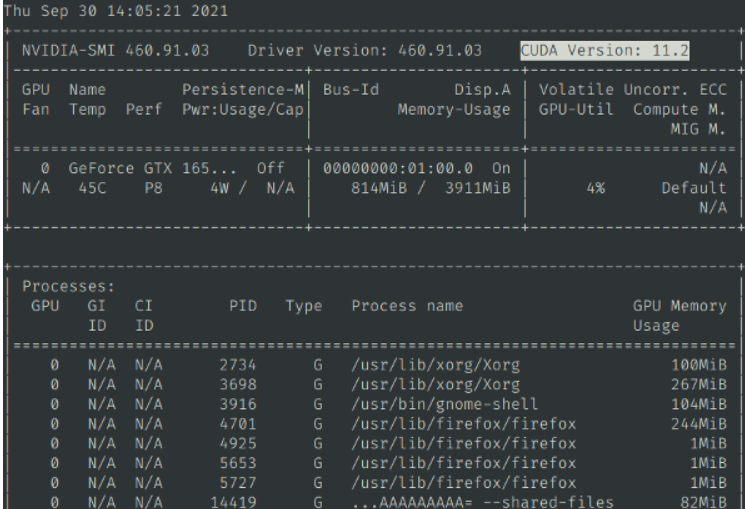
然后继续输入`nvidia-smi`,确认有输出信息,并且能看到cuda版本号,类似该图
|
|
|

|
|
|
|
|
|
然后执行 `python testcuda.py`,如果提示成功,说明安装正确,否则请仔细检查重新安装
|
|
|
|
|
|
默认使用 cpu 运算,如果确定使用英伟达显卡,并且配置好了cuda环境,请修改 set.ini 中 `devtype=cpu`为 `devtype=cuda`,并重新启动,可使用cuda加速
|
|
|
|
|
|
# 注意事项
|
|
|
|
|
|
0. 如果没有英伟达显卡或未配置好CUDA环境,不要使用 large/large-v3 模型,可能导致内存耗尽死机
|
|
|
1. 中文在某些情况下会输出繁体字
|
|
|
2. 有时会遇到“cublasxx.dll不存在”的错误,此时需要下载 cuBLAS,然后将dll文件复制到系统目录下,[点击下载 cuBLAS](https://github.com/jianchang512/stt/releases/download/0.0/cuBLAS_win.7z),解压后将里面的dll文件复制到 C:/Windows/System32下
|
|
|
3. 如果控制台出现"[W:onnxruntime:Default, onnxruntime_pybind_state.cc:1983 onnxruntime::python::CreateInferencePybindStateModule] Init provider bridge failed.", 可忽略,不影响使用
|
|
|
4. 默认使用 cpu 运算,如果确定使用英伟达显卡,并且配置好了cuda环境,请修改 set.ini 中 `devtype=cpu`为 `devtype=cuda`,并重新启动,可使用cuda加速
|
|
|
|
|
|
|
|
|
|
|
|
5. 尚未执行完毕就闪退
|
|
|
|
|
|
如果启用了cuda并且电脑已安装好了cuda环境,但没有手动安装配置过cudnn,那么会出现该问题,去安装和cuda匹配的cudnn。比如你安装了cuda12.3,那么就需要下载cudnn for cuda12.x压缩包,然后解压后里面的3个文件夹复制到cuda安装目录下。具体教程参考 https://juejin.cn/post/7318704408727519270
|
|
|
|
|
|
如果cudnn按照教程安装好了仍闪退,那么极大概率是GPU显存不足,可以改为使用 medium模型,显存不足8G时,尽量避免使用largev-3模型,尤其是视频大于20M时,否则可能显存不足而崩溃
|
|
|
|
|
|
# 相关联项目
|
|
|
|
|
|
[视频翻译配音工具:翻译字幕并配音](https://github.com/jianchang512/pyvideotrans)
|
|
|
|
|
|
[声音克隆工具:用任意音色合成语音](https://github.com/jianchang512/clone-voice)
|
|
|
|
|
|
[人声背景乐分离:极简的人声和背景音乐分离工具,本地化网页操作](https://github.com/jianchang512/vocal-separate)
|
|
|
|
|
|
# 致谢
|
|
|
|
|
|
本项目主要依赖的其他项目
|
|
|
|
|
|
1. https://github.com/SYSTRAN/faster-whisper
|
|
|
2. https://github.com/pallets/flask
|
|
|
3. https://ffmpeg.org/
|
|
|
4. https://layui.dev
|
|
|
|